

Installing door hinges correctly is a critical step in any door installation project. Whether you are working on residential wooden doors or heavy-duty commercial and fire-rated doors, proper hinge installation directly affects door alignment, load-bearing performance, smooth operation, and long-term durability. Incorrect hinge positioning or poor installation can lead to sagging doors, uneven gaps, excessive noise, and premature hardware failure.
This comprehensive guide explains how to install door hinges step by step, covering preparation, positioning, mortising, fixing, and adjustment, while also addressing common questions people ask when installing door hinges.
Why Correct Door Hinge Installation Matters
Door hinges are not just connecting components; they are load-bearing mechanical parts that support the entire weight of the door while allowing controlled movement. When hinges are installed incorrectly, even high-quality door hardware cannot perform as intended.
Correct installation ensures even weight distribution across the door leaf and frame, stable opening and closing, reduced friction, and longer service life for both the door and the hinges. In commercial buildings, hospitals, hotels, and public spaces, proper hinge installation also contributes to safety compliance and user comfort.
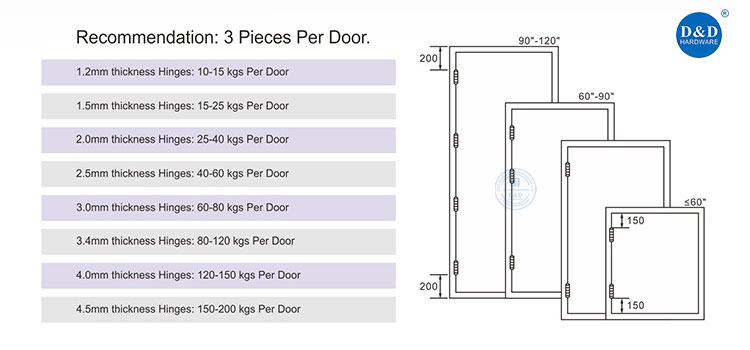
Choosing the Right Hinges Before Installation
Before installing door hinges, it is important to confirm that the hinge type, size, and load rating match the door application. Interior lightweight doors usually require standard butt hinges, while exterior, fire-rated, or high-traffic doors require heavy-duty hinges with higher load capacity.
The number of hinges is equally important. Two hinges may be sufficient for lightweight interior doors, but most standard doors require three hinges for stability. Taller, heavier, or fire-rated doors often require three or four hinges to prevent sagging and ensure compliance with building standards.
Material selection also matters. Stainless steel hinges are commonly used for their strength, corrosion resistance, and suitability for both residential and commercial environments.
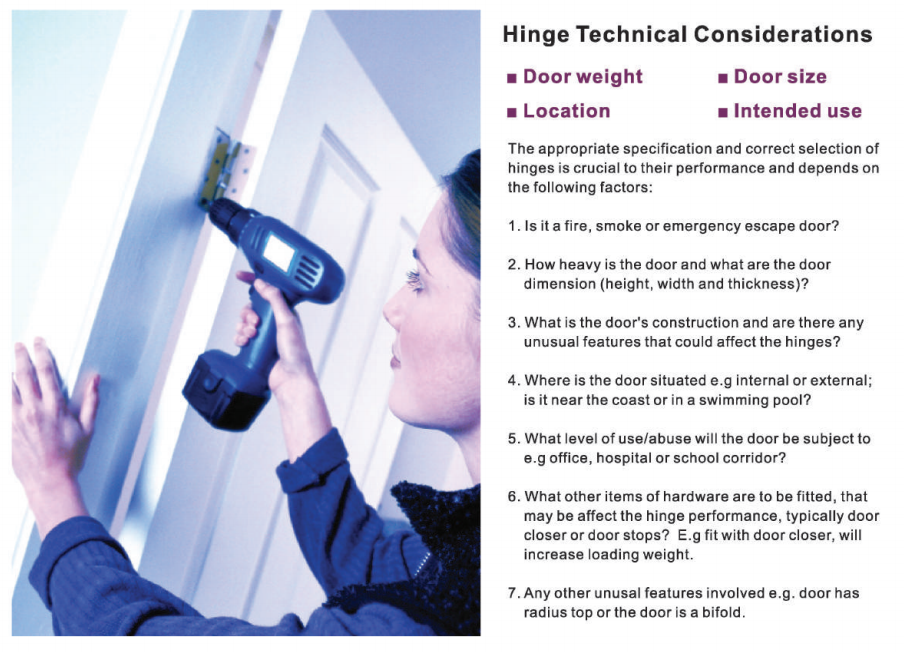
Tools and Preparation for Installing Door Hinges
Preparation is essential for a clean and accurate installation. Having the right tools ready reduces mistakes and saves time during installation.
Basic tools typically include a tape measure, pencil, chisel, hammer, screwdriver or drill, level, and appropriate screws. For metal doors or frames, self-tapping screws or machine screws may be required. Always use screws that match the hinge specification to ensure proper fixing strength.
Before installation, ensure the door and frame are free from damage and that the door opening is square. Installing hinges on an uneven frame can cause alignment issues even if the hinges are positioned correctly.
Step 1: Measure and Mark Hinge Locations
Accurate hinge placement is the foundation of proper installation. The top hinge is usually positioned about 150 to 200 millimeters from the top edge of the door, while the bottom hinge is placed approximately 200 to 250 millimeters from the bottom. If a third hinge is used, it should be centered evenly between the top and bottom hinges.
Mark these positions clearly on the door edge using a pencil and measuring tape. Consistent spacing helps distribute the door’s weight evenly and prevents stress concentration on a single hinge.
Step 2: Mark the Hinge Outline on the Door
Place the hinge leaf against the marked position on the door edge and align it carefully. Use a pencil to trace the full outline of the hinge leaf. This outline defines the mortise area where the hinge will sit.
A flush hinge installation is essential. If the hinge protrudes from the surface, the door may not close fully. If recessed too deeply, the hinge may bind and restrict smooth movement.
Step 3: Cut the Hinge Mortise
Using a sharp chisel, carefully remove material within the outlined area to create the hinge mortise. Work gradually, removing thin layers to control depth and maintain a flat surface. The mortise depth should match the exact thickness of the hinge leaf.
For professional or large-scale installations, a router with a hinge jig can be used to achieve consistent and precise results. Regardless of the method, accuracy at this stage directly affects door alignment.
Step 4: Fix the Hinges to the Door
Once the mortises are complete, place the hinges into position and secure them to the door using screws. Start by inserting one screw per hinge to allow for minor adjustments. Check that the hinge knuckles align evenly along the door edge.
After confirming alignment, install the remaining screws securely. Avoid overtightening, as this can damage the screw threads or distort the hinge.
Step 5: Position the Door in the Frame
With hinges attached to the door, carefully place the door into the frame. This step is easier with assistance or by using wooden wedges to support the door at the correct height.
Ensure the door is level and that the gaps along the top and sides are even. Proper positioning at this stage prevents common problems such as rubbing, binding, or uneven closing.
Step 6: Attach Hinges to the Frame
Once the door is correctly positioned, mark the screw holes on the door frame through the hinge holes. Pre-drill pilot holes if necessary, especially for hardwood or metal frames.
Secure the hinges to the frame, again starting with one screw per hinge. Test the door movement before fully tightening all screws. The door should swing smoothly without resistance.
Step 7: Final Checks and Adjustments
After installation, open and close the door several times to ensure smooth operation. Check that the door aligns properly with the frame and that the latch meets the strike plate correctly.
If minor sagging occurs, tightening the top hinge screws or replacing one screw with a longer screw that reaches the structural frame can improve support. Small adjustments at this stage can significantly improve long-term performance.
Common Mistakes to Avoid When Installing Door Hinges
One common mistake is incorrect hinge spacing, which can cause uneven weight distribution. Another is cutting hinge mortises too deep or too shallow, leading to alignment issues.
Using incorrect screws or low-quality fasteners can reduce fixing strength, especially on heavy or high-traffic doors. For commercial or fire-rated doors, using non-compliant hinges or installation methods can also lead to safety issues.
How to Install Door Hinges on Different Door Types
Wooden doors are the most forgiving and allow for easier mortising and adjustment. Metal doors and frames require more precision, and hinge positions are often pre-defined.
Fire-rated doors must use approved hinges and follow manufacturer guidelines strictly to maintain fire resistance performance. Always follow local building codes and certification requirements for these applications.
Frequently Asked Questions About Installing Door Hinges
How many hinges does a door need?
Most standard doors require three hinges. Heavier or taller doors may require four hinges for added stability.
Should door hinges be flush with the door?
Yes, hinges should sit flush within the mortise. A proud or over-recessed hinge can cause closing problems and premature wear.
Can I install door hinges without a router?
Yes, a sharp chisel is sufficient for most installations. A router simply improves speed and consistency.
Why does my door sag after installing hinges?
Door sagging is often caused by loose screws, incorrect hinge spacing, or insufficient hinge load capacity.
Do hinges affect fire-rated door performance?
Yes, only approved hinges installed correctly will maintain the fire rating of a fire-rated door assembly.
Conclusion
Installing door hinges correctly is essential for door performance, durability, and safety. By following proper measuring, mortising, fixing, and adjustment techniques, you can achieve professional results across residential and commercial projects.
A well-installed hinge not only improves door operation but also extends the lifespan of the entire door system, making hinge installation a critical part of any door hardware solution.