

Installing a door stop may look like a small task, but it plays a crucial role in protecting walls, furniture, door hardware, and the door itself from unnecessary impact damage. For homeowners, contractors, and builders, understanding the proper installation method ensures durability, safety, and long-term performance. At D&D Hardware, we supply a wide range of high-grade door stops engineered for both residential and commercial environments, including wall-mounted, floor-mounted, magnetic, and heavy-duty stops designed to support high-traffic facilities. This comprehensive guide walks you through how to install a door stop correctly, how to choose the right type, what tools you need, and professional tips to ensure precise installation results.
A door stop is not only a protective accessory—it is an essential part of a complete door opening system. Whether your project involves wooden doors, metal doors, or fire-rated doors, choosing quality hardware is vital. D&D door stops, made from robust materials like stainless steel 304/316 and zinc-free options depending on your preference, deliver reliable performance and extended service life. Proper installation ensures you get the most from these benefits and avoid common issues such as misalignment, loose mounting, and insufficient buffer distance. This article serves as a practical guide for installers at all levels, combining technical expertise with accessible instruction.
1. Understanding Door Stops and Why Proper Installation Matters
A door stop is a small but critical piece of hardware used to limit a door’s swing path, prevent damage, and control motion. When a door opens too far, the handle, lock, or edge can strike the wall or adjacent furniture, causing dents, cracks, and wear over time. A well-chosen and correctly installed door stop eliminates this problem by absorbing impact or restricting the degree of opening.
Different spaces call for different types of door stops. For example, commercial buildings with heavier doors often require mounted floor stops or wall stops with premium rubber buffers, while modern residential interiors may prefer magnetic door stops that offer smooth opening, quiet operation, and a clean visual profile. D&D Hardware manufactures a variety of designs to accommodate architectural preferences and functional needs.
Improper installation—such as miscalculating door swing, choosing the wrong mounting location, or drilling without checking wall structure—can result in malfunction or shortened lifespan. Therefore, understanding how to install a door stop correctly is essential for ensuring durability, safety, and aesthetics. Learning the proper steps helps you avoid uneven mounting surfaces, loose screws, collision misalignment, and insufficient impact absorption.
2. Types of Door Stops
Choosing the correct type of door stop depends on the door material, wall type, flooring surface, interior design, and functional needs. Below is a table summarizing common types.
Table: Common Types of Door Stops
| Door Stop Type | Typical Installation Location | Key Benefits |
|---|---|---|
| Wall-Mounted Door Stop | Wall behind the door | Easy installation, effective wall protection |
| Floor-Mounted Door Stop | Floor behind or beside the door | Strong stability, durable impact resistance |
| Magnetic Door Stop | Wall or floor | Prevents slamming, holds door open |
| Hinge Pin Door Stop | Door hinge | No drilling needed, discreet appearance |
| Kickdown Door Stop | Bottom of door | Holds door open manually |
| Heavy-Duty Industrial Stop | Floor or structural surface | Handles high impact, long lifespan |
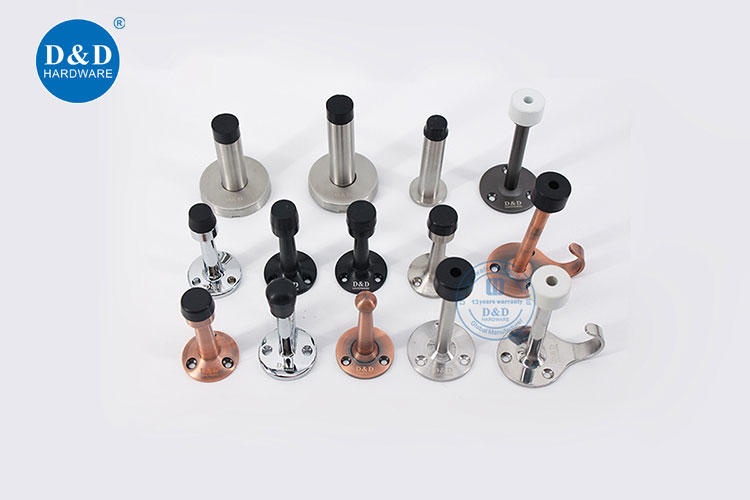
3. Tools and Materials Needed for Installing a Door Stop
Before beginning installation, prepare the following tools and materials. The exact list may vary depending on the mounting surface and door stop type, but the most common items include:
Tape measure
- Pencil or marker for marking the spots
- Drill with suitable drill bits (masonry, wood, or metal bits depending on the surface)
- Screwdriver (manual or electric)
- Anchors/wall plugs (if installing on drywall or hollow wall)
- Mounting screws (usually included with D&D door stops)
- Rubber mallet (optional)
- Level tool
- Adhesive (for adhesive-based models)
Having the correct tools ensures a smooth installation and minimizes risks of damaging the wall or misplacing drill holes. D&D’s door stop packages are equipped with matching screws and accessories to ensure compatibility and stability during installation. Many of our models also include concealed mounting plates to enhance aesthetics and prevent tampering.
4. How to Install a Wall-Mounted Door Stop
Wall-mounted door stops are among the most commonly used types, offering quick installation and effective protection. They are typically placed at the height of the door handle or where the door makes contact with the wall.
Step-by-Step Instructions
Installing a wall-mounted door stop requires careful positioning. Begin by opening the door gently and observe where the handle or door edge approaches the wall. Mark this location with a pencil and ensure it aligns with the expected point of impact. Precision in this initial marking step will determine the effectiveness of the door stop.
Steps:
1. Measure the distance between the door and the wall when fully opened to determine the ideal mounting point.
2. Mark the exact spot where the door stop should be mounted.
3. Use a drill to create the pilot hole; if the wall is concrete, use a masonry bit.
4. Insert the wall plug or anchor if needed.
5. Position the base plate of the stop and install the mounting screws.
6. Attach the stop body, cap, or rubber buffer depending on the model.
7. Test the door swing and ensure the stop absorbs impact correctly.
Wall-mounted stops from D&D Hardware use durable rubber tips and stainless steel housings to ensure stable performance while maintaining a sleek appearance suitable for modern interiors.
5. How to Install a Floor-Mounted Door Stop
Floor-mounted door stops provide superior stability and are excellent for heavier or frequently used doors. Their installation differs from wall-mounted versions because the position must account for floor materials and the door’s opening radius.
Begin by identifying where the door reaches its desired open position. Place the door stop on the floor and verify the alignment with the door edge. In commercial settings or heavy-duty doors, it’s essential to choose a robust stainless steel model such as those offered by D&D, which resist corrosion and maintain high impact durability.
Installation Process
To install a floor-mounted door stop, open the door fully to determine the correct location. The chosen position should allow the buffer to make consistent contact with the lower section of the door without obstructing movement. Mark the drill position on the floor using a pencil. If installing on marble or tile, use a drill bit specifically designed for hard surfaces to prevent cracking. After drilling, insert the anchor plug, secure the mounting screw, and firmly attach the door stop. Once installed, test the door by opening it slowly to ensure the stop absorbs impact effectively. If adjustment is needed, reposition the base before tightening the screws fully.
Floor-mounted stops provide excellent longevity because they absorb force at the strongest point—the floor—making them ideal for both residential and commercial installations.
6. Installing a Magnetic Door Stop
Magnetic door stops combine impact protection with the added benefit of holding a door open. They are popular in hotels, offices, and modern homes. Installation can be completed on either the floor or the wall depending on the model.
Installing a magnetic stop requires aligning two components: the magnet base and the strike plate attached to the door. Start by positioning the magnet unit on the ground or wall where you want the door to stay open. Next, extend the door until it reaches the intended magnetic catch point. Mark this location on both surfaces for accurate placement.
Steps include:
- Mount the magnet base first, ensuring it is level and stable.
- Attach the strike plate to the corresponding point on the door.
- Test the magnetic connection by slowly opening the door toward the stop.
- Make alignment adjustments if the magnet does not catch smoothly.
- Tighten all screws once alignment is correct.
D&D magnetic door stops are designed with strong neodymium magnets that provide reliable holding power, ensuring the door stays firmly in place without accidental release. This makes them ideal for high-use environments and premium residential projects seeking both function and elegance.
7. Common Installation Mistakes and How to Avoid Them
Even experienced installers can make errors when placing a door stop. Below are the most common mistakes and how to avoid them to ensure a long-lasting and secure installation.
Typical Mistakes Include:
- Installing the stop too close to the hinge side, reducing effectiveness
- Drilling without checking wall or floor material, causing cracks
- Misalignment between door and stop
- Using the wrong type of drill bit or anchor
- Failing to consider door weight
To prevent these issues, always test the door swing fully before drilling, use the appropriate hardware for each material, and follow alignment guidelines strictly. D&D door stops come with installation diagrams to ensure accuracy even for first-time installers.
Please contact us at any time.
David Jian:
Email:sales@danddhardware.com
Tel / WhatsApp / Wechat:+86-139 2903 7292