

How to Remove a Panic Bar
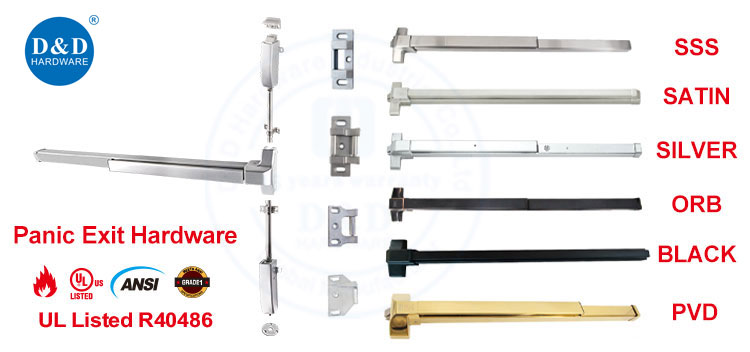
A panic bar, also known as a crash bar or exit device, is an essential safety component installed on emergency exit doors in commercial buildings, schools, hospitals, and public facilities. Over time, these devices may need to be replaced, upgraded, or removed for door maintenance. Knowing how to remove a panic bar properly ensures the door remains undamaged and that the new hardware can be installed smoothly. This comprehensive guide explains the tools you need, the safety precautions to follow, and the complete removal steps, helping beginners and professionals complete the task efficiently.
Why You May Need to Remove a Panic Bar
There are several reasons why removing a panic bar becomes necessary:
1. Replacing an old or damaged panic device
Continuous use can cause internal mechanisms to wear out. When repair is no longer effective, replacing the unit is the best solution.
2. Upgrading to a new model
Many buildings update their hardware to improve accessibility, user convenience, or fire-safety performance. Removing the old panic bar is the first step in the upgrade process.
3. Repainting or refinishing the door
Doors undergoing renovation often require full hardware removal to ensure a clean, professional finish without paint interfering with moving parts.
4. Changing building layout or door function
Some facilities modify exit routes or convert emergency doors into standard entry doors, making panic bar removal part of the transition.
Tools You Need to Remove a Panic Bar
Before starting, prepare these commonly used tools:
-
Phillips screwdriver
-
Flathead screwdriver
-
Allen keys (depending on model)
-
Drill (optional for stubborn or corroded screws)
-
Ladder (for tall or double doors)
-
Marker and tape (for noting screw positions)
-
Safety gloves
Every panic bar model differs slightly, so having a complete set of basic tools is helpful.
Safety Precautions Before Removing a Panic Bar
Because panic bars are part of a building’s safety design, removing them must be done with caution.
1. Confirm that the door can be temporarily deactivated
Make sure the door is not required for emergency exit during the maintenance period. If necessary, notify building personnel or place a “Door Out of Service” sign.
2. Avoid working during business hours
When possible, remove the panic bar during low-traffic times to avoid interfering with occupants.
3. Inspect the door for wiring
Some panic bars include alarms or electronic latches. Disconnect power before removal.
4. Wear gloves to avoid injuries
Metal edges and springs inside the device can cause cuts.
Step-by-Step Guide: How to Remove a Panic Bar
Follow these instructions carefully to remove the device without damaging the door or surrounding hardware.
Step 1: Examine the Panic Bar Mechanism
Identify the brand, model, and mounting style. Most panic bars consist of:
-
A cover plate or housing
-
Mounting screws
-
Latch mechanism
-
End caps
-
Vertical rod components (if it is a vertical rod panic bar)
Familiarizing yourself with the configuration helps you remove each component systematically.
Step 2: Remove the Panic Bar Cover Plate
Most panic bars have a metal cover that conceals internal mechanisms.
-
Locate the screws holding the cover plate.
-
Use a screwdriver to remove them.
-
Gently lift or slide the cover off.
Place all screws in a safe container to avoid losing them.
Step 3: Disconnect the Internal Mechanism
After removing the cover, you’ll see the internal push bar mechanism.
-
Identify the connecting rods or bars linked to the latch.
-
Detach them carefully using a screwdriver or Allen key.
-
If the panic bar is an alarmed model, disconnect wires from the power source.
Be gentle with internal components, especially if you plan to reuse the device.
Step 4: Unscrew the Panic Bar from the Door
With the mechanism disengaged, you can now remove the panic bar from the door.
-
Locate the mounting screws on the backplate or base rail.
-
Remove the screws one by one.
-
Support the panic bar with your other hand to prevent it from falling during the final screw removal.
Once all screws are removed, lift the panic bar off the door.
Step 5: Remove the Latch or Strike Plate
Most panic bars work together with a latch mechanism on the door edge.
-
Open the door and find the latch assembly.
-
Remove screws from the latch case.
-
Slide the latch out of the door edge.
-
Unscrew the strike plate from the door frame.
This completes the full removal process.
Removing a Vertical Rod Panic Bar
If your panic bar includes vertical top and bottom rods, the removal steps include:
-
Remove top cover caps.
-
Unscrew the top and bottom rod guides.
-
Disconnect rod linkage from the bar mechanism.
-
Pull rods out gently once the bar is detached.
Vertical rod devices require additional care because rods can be long and delicate.
Tips for Smooth Panic Bar Removal
-
Keep all screws organized; label their positions if needed.
-
Take photos before and during removal to guide reinstallation.
-
If screws are stuck, apply a small amount of penetrating oil.
-
Avoid bending or twisting the bar, especially if you plan to reuse it.
-
After removal, clean the screw holes and door surface before installing new hardware.
What to Do After Removing a Panic Bar
Once the panic device is fully removed, you can:
-
Install a new panic exit device
-
Repaint or refinish the door
-
Convert the door to standard handle-and-lock operation
-
Repair dents or scratches caused by old hardware
Always ensure the door complies with local building safety requirements after modification.
Conclusion
Removing a panic bar is a manageable task when you follow the proper steps and have the right tools. Whether you’re replacing old hardware, preparing the door for maintenance, or upgrading to a modern system, understanding the removal process helps you work more efficiently and safely. A carefully executed removal ensures your door is ready for its next stage, whether that is a new panic device or a completely different setup.